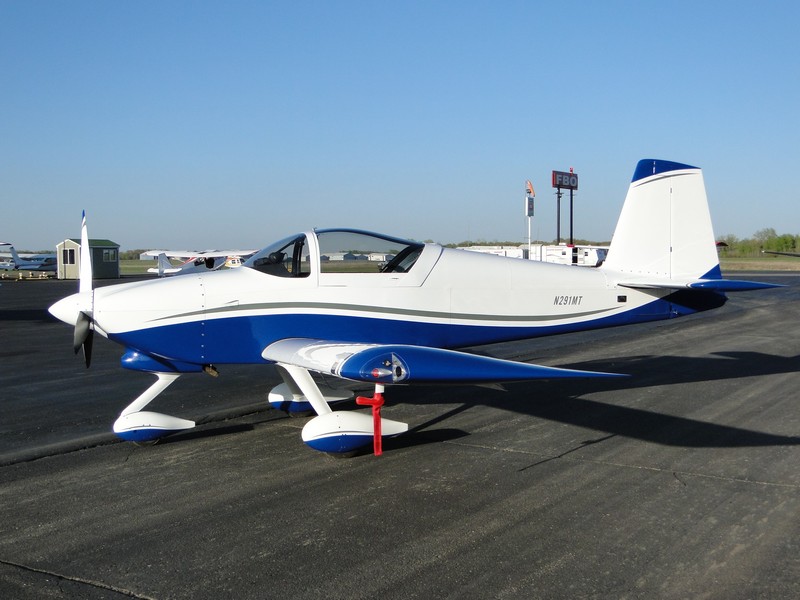
For anyone wondering how my domain name, mikesrv9a.com, has something to do with all my hobbies, one of my biggest hobby was building and flying my own airplane, a Van’s Aircraft RV-9A.
Going back to my school days I always wanted to be a pilot, although I eventually realized that my interest was more in being a private pilot vs. it being a career. In my college days I completed about half of my private pilot training, including soloing a bunch of times. I stopped my training for a few years but once I was a little more established in my career I got back into flying and earner my private pilot license. I eventually joined a local flying club that owned three Cessna’s and even went on to earn my instrument rating.
While I knew some people built ‘experimental’ airplanes, I always assumed that this was a pretty crazy idea and not something I’d be willing to risk. Then one day I learned about Van’s Aircraft kit airplanes. Literally thousands of people had built, were building and/or were flying their RV airplanes. The performance of these planes is excellent, fast, responsive, easy to fly and clearly a lot of fun. It took me all of a few days before I decided I was going to build myself an RV-9A, even though I had never seen, much less flown in one.
The empennage/tail kit arrived in December 2005 and I got to work building. Learning to rivet is actually pretty easy and within a few months I had the horizontal and vertical stabilizers, elevators and rudder built. As I was building the empennage parts I decided to create a website showing my progress, selecting mikesrv9a.com as my domain.
With the tail done, it was time to get started on the wing kit, which comes in two big boxes delivered to the house by semi. I went with the slow-build wing kit instead of the partially built kit in part because I enjoyed building and in part because I wanted to save up for a really nice panel. While the empennage parts aren’t overly large, the first time you pull out the wing spars you start to realize how large the plane is going to be. Drilling and countersinking the wing spars is also a bit nerve-wracking, concerned that you’ll make a mistake, but there’s really little need to worry. For much of the wing construction it was easiest to mount two 4×4 posts from the floor to ceiling in my garage and then have the wing span between them. This makes riveting the wing skins on a lot easier and take up less space.
One of the more difficult part of the wing build is the fuel tanks. The RV’s use a wet wing type of tank and to keep the fuel from leaking out you use a two-part fuel tank sealant applied to all the joints before you rivet. It’s a challenge to get all your parts really clean, then apply the sealant, cleco the parts together and then riveting them in the hour or so of working time you have, all without getting the sealant all over you, your clothes and everywhere else. Fortunately both my tanks ended up leak free the first time.
With the wings mostly complete it was time to get started on the fuselage. Again I went with the slow-build kit to save money, although the fast-build kits would have saved a lot of time. As the fuselage progresses you suddenly realize just how big this airplane is and also realize that you’re getting closer and closer to flying. Eventually you get to climb into the cockpit area for the first time and have fun making airplane noises while you pretend you’re in the air!
The fuselage is also fun as this is now where you get to start doing a lot of other things than deburring, dimpling and riveting aluminum. You get to start installing fuel and brake lines, running electrical wires, planning your panel and then cutting and installing the canopy. The canopy comes as a giant piece of plexiglass which needs to be fitted and cut into two parts. If you mess up the first one getting a replacement would be pretty costly so it makes sense to take a lot of care. I decided to glue my canopy to the frame, roll-bar and fuselage using Sikaflex and in the end couldn’t have been happier than how it came out.
While the majority of the plane is aluminum, the wingtips, empennage tips, cowl and wheel pants are made of fiberglass. At first I kind of dreaded working with fiberglass, but came to actually kind of like working with it. I even made the rear canopy skirts from fiberglass instead of using the aluminum ones provided and they came out great. Layering cloth and epoxy and then coating it with epoxy mixed with glass bubbles to make an easily sanded filler is pretty easy and you can do so much with it. Of course sanding is pretty messy, but once you get better at applying filler you can minimize the sanding (although there’s still a fair amount). Of course, I’d never want to build an entire airplane out of it.
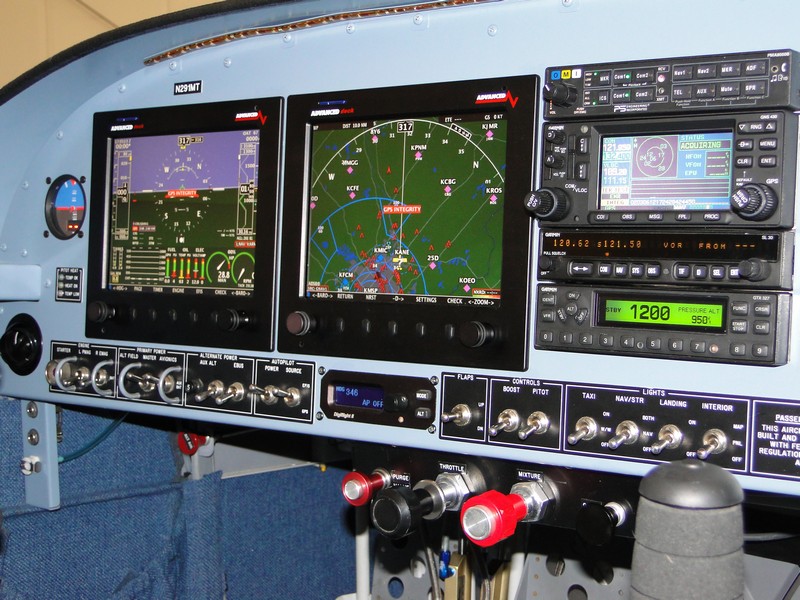
Eventually you get much of the aluminum work complete and it becomes time to install the electrical system and panel wiring. Knowing I was going with an all-glass panel and would be entirely reliant on electrical power to keep the blue side up, I went with a common electrical design that incorporates both a primary and backup alternator. In addition to the primary battery, I wanted to incorporate an avionics battery to add a little more redundancy as well as provide the ability to power my avionics on a separate, isolated bus during engine starts to prevent my avionics from rebooting with the starter running. I came up with a unique modification to the standard design that ended up working great (and the guy who created the design I started with later revised his design to incorporate some of my ideas).
In addition to wiring the electrical system, I also did the majority of the avionics wiring, which includes all the wires each of the avionics use to connect to their sensors and also communicate with the other avionics. With an all glass panel, including dual EFIS screens, a two-axis autopilot, a GPS NAV/COM and another NAV/COM radio, transponder, audio panel and other avionics, plus lots of switches and other stuff, there’s a lot of wires to install. My dad and I had done a lot of DIY electronics and playing with computers when I was a teenager so was pretty comfortable figuring out what needed to connect to what, crimping DB pins onto the wires and putting them into the DB connectors.
With the electrical and avionics wiring complete, the last big challenge was installing the engine, propeller and all the firewall forward components. Admittedly I didn’t know a lot about aircraft engines when I started, but Van’s drawing do a great job showing what needs to be installed where. In many ways, the firewall forward stuff was probably the easiest part of the build.
With all the major work done, it was time to bring the wings, fuselage, empennage and the rest of the parts to the airport so I got a car hauling truck to come out and load it up on their flatbed. The final assembly of my airplane took place in February through April of 2009. Once it was all assembled I had a couple of RV friends inspect the entire plane from end to end. They found a few minor items, but for the most part everything was in good shape. I also had to have an FAA inspector check out the plane and give the final sign-off as part of getting the airworthiness certificate.
With that complete, it was ready to fly. First flight was in May of 2009, taken up by another local RV friend who has a lot of experience. Aside from a minor oil leak, the first flight was uneventful and he reported that it flew great. A week or so later we had a perfect evening after work and so I took it up for the first time. Simply put, it was awesome. I had to fly it for 40 hours before I could take anyone else up with me, so I got a lot of flying in over the next couple of months.
After that, I spent the next six years having a lot of fun flying the plane, including trips to the Oshkosh and Sun’n’Fun airshows and a few other far away places. Most of my flying was local or regional, taking a lot of friends and family up plus a number of kids through the EAA Young Eagles program. Along the way I decided I wanted to build again and got an RV-10 about half-built, then decided it was more airplane than I really needed and ended up selling it.
Finally, with many other hobbies taking up more and more of my time, I decided to sell my RV-9A and get out of aviation. Along the way I learned a lot, had a lot of fun, made a lot of great friends and am really glad I built and flew my own plane.
Hi Mike
I’m building a 9a and keep seeing references here and there to your build site. Is it still available on the internet?
Thanks
Mark